
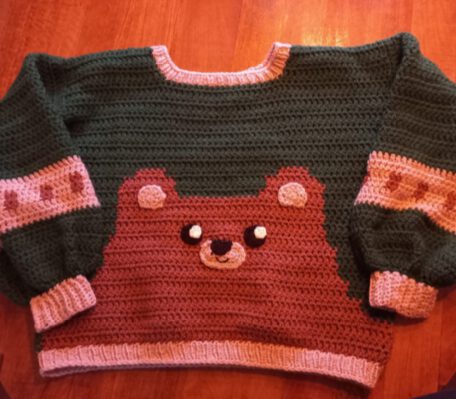
Finch Inspired Bear Sweater (one size)
A free pattern by GhostieOllieCrochet

Disclaimers:
For now this pattern is only available in the size I made it in for myself (measurements listed below at finished measurements and gauge)
You could technically achieve different sizes by using a different hook or yarn, but I have not made these myself and cannot tell you the gauges you would need to aim for. I am hoping to make some other sizes in the future and have these tested, but that is not doable for me at this moment.
If you want to size up the pattern and you dont mind your bear being proportionally smaller you could always just add a couple stitches on either side of the colourwork and/or add some extra rows in the background colour above the colourwork.
In the sweater I made for myself I knit the bottom ribbing and the collar, I will tell you how I did this and give suggestions on crochet ribbing for those that can’t knit.
For big projects like this make sure to read the full pattern before starting
Materials:
I used approximately 5 skeins of the background colour and one of each of the accent colours. The yarn I used was a worsted weight acrylic/wool mix. I used scrap acrylic for the eyes and snout.
6mm crochet hook
Tapestry needle
Scissors
Measuring tape
Optional:
6mm circular knitting needles (40cm or smaller cord)
Stitch markers
Skills and abbreviations:
For this sweater you need to know how to chain, single crochet, double crochet, increase, decrease, slip stitch, sew, crochet in the round, magic circle, colour change, and weave in ends.
Reading a color graph is handy, but not required as I’ll provide a written version of the colorwork too.
Additionally you might want to know how to knit, purl, do a stacked single crochet and do a foundation double crochet.
CH -Chain
SC – Single crochet
DC- Double crochet
Dec – Decrease
Inc – Increase
C1 – Color 1
C2 – Color 2
C3 – Color 3
(number) – stitches at the end of this round
On my sweater C1 = green, C2 = brown and C3 = beige
Finished measurements and gauge:
Finished sweater measurements:
Chest width (one panel): 57 cm→ so 114 cm around
Torso length, top of shoulder to bottom ribbing: 53 cm
Arm width: 50 cm around, 25 cm flat lay
Arm lenght end of body panel to end of cuff: 49 cm
Neck hole: 40cm around, 20cm flat lay
According to the craft yarn council this puts this sweater at an extra large, I would argue it is designed to have quite some positive ease and I would advise it for those that typically wear a medium/large.
Take a look at the measurements and your measurements, maybe compare it to a sweater that fits you comfortably. I encourage you to make small tweaks like leaving extra room for the neck hole or making it a couple rows longer if you think this will help.
When you take the time to make yourself a garment you should make sure it fits you in a way you would enjoy wearing it.
Gauge:
11 stitches by 7 rows = 10 cm by 10 cm
Graph reading instructions:
Below you will see the graph I made when designing this sweater.
Each square is 2 double crochets for 1 row. This means the colourwork is 60 stitches wide and 34 rows long.
A slash through a block means this is a “half block”, meaning it is 1 double crochet of each colour.
Only the brown and green squares are part of the colourwork, the lines resembling the ears and face are there to help visualise the placement, they do not represent colour changes. The face and ears are crocheted separately and sewn on, to make sure they are nice and rounded.

Starting the colourwork panel (front):
In your C2 Loosely CH 62, if needed you could size up your hook for the chain.
Row 1: DC in the 3rd chain from the hook, DC 59 (60)
OR
In your C2 foundation double crochet 60, counts as row 1
A good tutorial on how to do this would be CROCHET LIKE A PRO – How to Make Chainless Foundation Crochet Stitches
Each row you turn your work and either chain 2 to get up to double crochet height and then ignore your chain 2 at the end of the round OR you do a stacked single crochet (what I did) How to Double Crochet | Stacked Single Crochet | Beginner Tutorials
Be careful to keep your color changes on the wrong side of your work.
If you understand how to follow the graph, do so. Otherwise continue the written instructions below, each stitch is a double crochet!:
Row 2-4: (C2) x 60
Row 5: (C1) x 4, (C2) x 52, (C1) x 4
Row 6: (C1) x 6, (C2) x 48, (C1) x 6
Row 7: (C1) x 8, (C2) x 44, (C1) x 8
Row 8: (C1) x 8, (C2) x 44, (C1) x 8
Row 9: (C1) x 9, (C2) x 42, (C1) x 9
Row 10: (C1) x 10, (C2) x 40, (C1) x 10
Row 11: (C1) x 10, (C2) x 40, (C1) x 10
Row 12: (C1) x 10, (C2) x 40, (C1) x 10
Row 13: (C1) x 11, (C2) x 38, (C1) x 11
Row 14: (C1) x 12, (C2) x 36, (C1) x 12
Row 15: (C1) x 12, (C2) x 36, (C1) x 12
Row 16: (C1) x 12, (C2) x 36, (C1) x 12
Row 17: (C1) x 12, (C2) x 36, (C1) x 12
Row 18: (C1) x 12, (C2) x 36, (C1) x 12
Row 19: (C1) x 12, (C2) x 11, (C1) x 14, (C2) x 11, (C1) x 12
Row 20: (C1) x 12, (C2) x 10, (C1) x 16, (C2) x 10, (C1) x 12
Row 21: (C1) x 13, (C2) x 9, (C1) x 16, (C2) x 9, (C1) x 13
Row 22: (C1) x 15, (C2) x 5, (C1) x 20, (C2) x 5, (C1) x 15
Row 23-34: (C1) x 60
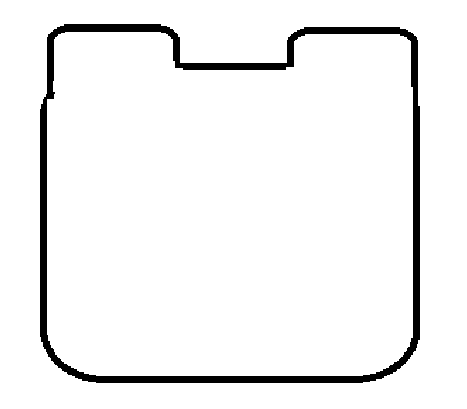
Now we have the main portion of the panel done, we will extend the shoulder section a bit
With the yarn still attached from the main portion
Row 35-38: Dc 20
Snip yarn, reattach 20 stitches from the end of row 34 and repeat
Row 35-38: Dc 20
You should now have a shape like this
The bear face:
The face details for the bear are crocheted and sewn on, you can choose to do this now, while your front panel is disassembled, or later once the rest of your sweater is finished and assembled to help you see how the placement of the face falls on your body.
The eyes (make 2):
In black scrap yarn dc 12 in a magic circle, tighten your magic circle, slip stitch into the first stitch, cut yarn leave a long enough end for sewing.
In white scrap yarn sc 6 into a magic circle, tighten your magic circle, slip stitch into the first stitch, cut yarn leave a long enough end for sewing.
You should now have a black circle and a smaller white circle, sew your white circle onto the black circle connected to an outside stitch
The snout and nose:
In C3 ch 7, we’re crocheting around the chain here.
In the 2nd chain from the hook sc 3 stitches in a single stitch (so kind of like increasing twice in the same stitch!), sc 4, sc 3 in one stitch, sc 4. This concludes round 1, add a stitchmarker if you need to
Round 2: inc, sc, inc, sc 4, inc, sc, inc, sc 4
Slip stitch into the next stitch to finish off, leave a long end for sewing
In black scrap yarn DC 5 into a magic circle, close up the magic circle
Do not slip stitch to close the circle, instead leave it open so it is a rounded triangle. Chain 1 and cut the yarn and pull it through to fasten off.
Sew your nose onto the top center of the snout, embroider his little smile at this point too
The ears (make 2):
In C3 dc 6 into a magic circle, close the magic circle but do not slip stitch to connect, instead chain 1 and turn your work,
Inc, sc, inc 2, sc, inc
Now you should be back at the edge of your unsealed first round: sc into the side of the double crochet stitches to round off the bottom. Slip stitch to finish off, leave a long end for sewing

Back panel:
The back panel is basically the front panel without colourwork! You could opt to add in stripes here (similar to those in the sleeve perhaps?), but I’ve left it plain to keep it simple for myself/
In your C1 Loosely CH 62, if needed you could size up your hook for the chain.
Row 1: DC in the 3rd chain from the hook, DC 59 (60)
OR
In your C1 foundation double crochet 60, counts as row 1
Row 2-34: Dc 60
And again we will extend the shoulder
With the yarn still attached from the main portion
Row 35-38: Dc 20
Snip yarn, reattach 20 stitches from the end of row 34 and repeat
Row 35-38: Dc 20
Your front and back panel should match.
Assembling the body:
You can now lay your front and back panel on top of eachother, right sides facing out and slip stitch or mattress seam your shoulder extensions together

You now have a longer rectangle with a headhole in the middle.

We will now single crochet across the long ends. Slip stitch into a corner and place 2 sc per row of dcs. You should be able to place them in the actual stitch opening and inbetween each stitch opening.
Now that you have a clean sc line across your side, we can close it up. Either slip stitch up half way from where you had your yarn attached OR cut your yarn with a very long tail and sew the sides together.

Repeat on the other side.
When counting in the round you should have 60 single crochets in your arm hole, we will work the sleeves into this.
Sleeves:
The sleeves are crochet in the round, slip sitch into your first double crochet of the round and turn your work to keep the seam nice and straight!
If you struggle to see where your final stitch is because of the slip stitch, use a stitch marker and count your stitches frequently!
*if you feel the stitches around the seams of the shoulder/armpit are a little messy you can decrease at them to sinch it in a bit, make sure you keep 60 stitches for starting though (so instead of crocheting into the seam itself, you decrease across the 2 stitches that are seamed together)
Row 1-18: C1 Dc 60 (60)
Row 19-20: C3 Dc 60 (60)
Row 21-22: C3 Dc 2, [C2 Dc 2, C3 Dc 4]*9, C2 Dc 2, C3 Dc 2(60)
Row 23-24: C3 Dc 60 (60)
Row 25-34: C1 Dc 60 (60)
Row 35: C1 Dc decrease 30 (30)
Row 36: C1: Sc decrease 15 (15)
Cut yarn
Repeat for the other sleeve.

Ribbing and cuffs

Ribbing on the bottom:
For the bottom ribbing I did a 1 by 1 rib knit in C3, meaning I picked up each stitch in the round and knit 1 purl 1 all the way around, it should have been 120 stitches. I did 10 rounds and used a crochet bind off.
For those that dont know how to knit or don’t own knitting needles in the right size you could
- Have a single/half double/double crochet border
- Do the same as listed for the cuffs later but on a bigger scale
- Look up another option for a fun crochet ribbing strategy
Collar:
For the collar I again did a 1 by 1 rib knit in C3, picking up stitches along the front, sides and back so that I would have an even number. I did 5 rounds and used a crochet bind off.
For those that dont know how to knit or don’t own knitting needles in the right size you could
- Have a single/half double/double crochet border
- Do the same as listed for the cuffs later but on a bigger scale
- Look up another option for a fun crochet ribbing strategy
For the collar it is important to keep in mind the corners we created with the shoulder extension part. Knit ribbing works really well to create a flat laying collar regardless of “minding the corners” but for a crochet collar you might want to decrease a bit in the corners to make sure it lays flat.
Cuffs:
For the cuffs I got frustrated with the magic loop method and used crochet
Use your C3 to attach to the sleeve, I like to attach where the seam is already, but it really doesnt matter.
While attached to the end of your sleeve Ch 9, sc 8 down your chain, slip stitch into the same stitch you started, slip stitch into the next stitch, sc8 back up your chain, chain 1 to turn your work and sc 8 down again, slip stitch into the same stitch, next stitch and repeat.
Once you get back to where you started, slip stitch or sew the cuff together and repeat for the other sleeve.
Please do not copy or repost this pattern. You are free to post pictures of, gift or sell the finished product. Credit to @ghostieolliecrochet or www.ghostieolliecrochet.nl is greatly appreciated.